Aws Nova Background Generation Guide
Background replacement with Amazon Bedrock in R: A Step-by-Step Guide
Developed from 05_background_replacement_using_mask_prompt
1. Load Necessary Libraries
First, we need to load the required libraries for AWS services, JSON handling, base64 encoding/decoding, and image processing.
2. Define the Image Generation Function
Next, we define a helper function generate_images that will handle the image generation process using Amazon Bedrock.
# Function to generate images using Amazon Nova
generate_images <- function(
    inference_params,
    output_directory,
    model_id = "amazon.nova-canvas-v1:0",
    client = NULL) {
  # Create client if not provided
  client <- client %||% bedrockruntime(region = "us-east-1")

  # Invoke the model with the provided parameters
  resp <- client$invoke_model(
    body = write_json_str(inference_params, auto_unbox = TRUE),
    modelId = model_id,
    accept = "application/json",
    contentType = "application/json"
  )

  # Create the output directory if it doesn't exist
  dir.create(output_directory, recursive = TRUE, showWarnings = FALSE)

  # Read the response body and decode the images
  resp_body <- read_json_raw(resp$body)
  img_raw <- lapply(resp_body$images, base64decode)
  img <- lapply(img_raw, image_read)

  # Save the request and response to JSON files
  write_json_file(
    inference_params,
    file.path(output_directory, "request.json"),
    auto_unbox = TRUE, pretty = TRUE
  )
  write_json_file(
    resp_body,
    file.path(output_directory, "response_body.json"),
    auto_unbox = TRUE, pretty = TRUE
  )

  # Save the generated images to the output directory
  for (i in seq_along(img)) {
    image_write(
      img[[i]], file.path(output_directory, sprintf("image_%s.png", i))
    )
  }
}
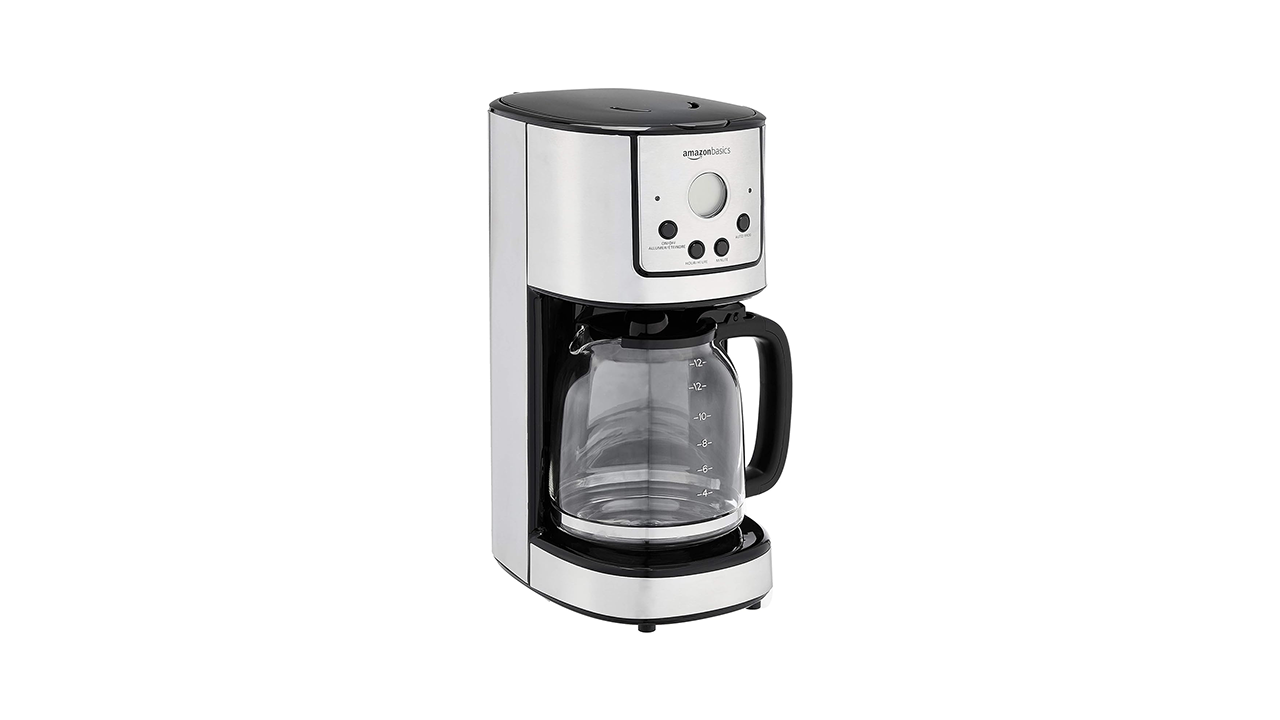
3. Set Up Directories and Source Image
We define the directories and specify the source image that we want to use for the image generation task.
# Define directories and source image
DIR <- "amazon_nova_example"
SOURCE_IMAGE <- file.path(DIR, "images/amazon-coffee-maker-1.png")
4. Encode the Source Image
The source image is encoded to base64 format, which is required for the inference parameters.
5. Define Inference Parameters
We set up the parameters for the image generation task, including the task type, description, mask prompt, and configuration.
# Define inference parameters for the image generation task
INFERENCE_PARAMS <- list(
  taskType= "OUTPAINTING",
  outPaintingParams= list(
    image= SOURCE_IMAGE_BASE64,
    text= "a coffee maker in a sparse stylish kitchen, a single plate of pastries next to the coffee maker, a single cup of coffee. highly detailed, highest quality, product imagery",  # Description of the background to generate
    maskPrompt= "coffee maker",  # The element(s) to keep
    outPaintingMode= "PRECISE"  # "DEFAULT" softens the mask. "PRECISE" keeps it sharp.
  ),
  imageGenerationConfig = list(
    numberOfImages= 1,  # Number of variations to generate. 1 to 5.
    quality= "standard",  # Allowed values are "standard" and "premium"
    cfgScale= 7.0,  # How closely the prompt will be followed
    seed= 123L # Set Seed
  )
)
6. Generate a Unique ID for the Output Directory
We create a unique ID for the output directory to ensure that each run of the script saves its results in a separate folder.
# Generate a unique ID for the output directory
GENERATION_ID <- strftime(Sys.time(), format = "%Y-%m-%d_%H-%M-%S")
OUTPUT_DIR <- file.path(DIR, "output", GENERATION_ID)
7. Call the Function to Generate Images
Finally, we call the generate_images function with the defined parameters and output directory to generate the images.